


TurnKeyInfo
SL500 Electro Freeze Cleaning Instructions

Disassembly and Cleaning
CAUTION
To avoid electrical shock or contact with moving parts, make sure all switches are in the “OFF” position and that the main power supply is disconnected. Some freezers have more than one disconnect switch.
It is important that the freezer be disassembled, washed, lubricated and sanitized before operation.
The cleaning and sanitizing instructions explained in this manual are required to maintain a clean, sanitary freezer. The freezer should be disassembled, cleaned, reassembled, lubricated and sanitized daily to ensure the best possible product quality and freezer operation.
Persons assembling, cleaning, or sanitizing the freezer must wash and sanitize hands and forearms with an approved sanitizer.
Cleaning Accessories
The following accessories shipped with the freezer are necessary for cleaning, sanitizing and disassembly/assembly.

| Item Number | Description | Use |
|---|---|---|
| HC150009 | BRUSH | 4-inch diameter with 36-inch handle, used for cleaning the cylinder. |
| HC158077 | BRUSH | Double end, 1-1/8 inch diameter and 7/16 inch diameter, used for cleaning the drain tube, mix inlet tube and mix feed tube. |
| HC158005 | BRUSH | 9/16 inch with 36 inch handle, used for cleaning drain tube and port between hopper and cylinder. |
| HC169374 | TOOL - O-RING REMOVAL | Aids in removing O-rings from plungers, dispense head, and mix feed tube. |
| HC158000A | LUBRICANT-PETROL GEL | Approved lubricant for moving parts and O-rings. See assembly instructions for lubricating points. |
| HC115536 | KIT - O-RING (NOT SHOWN) | This kit contains all O-rings and seal needing replacement on a regular basis. |
Disassembly Instructions
It is important that the freezer be disassembled, washed, lubricated and sanitized before operation. For maximum life on moving parts, disassemble and sanitize at the end of every day of operation.
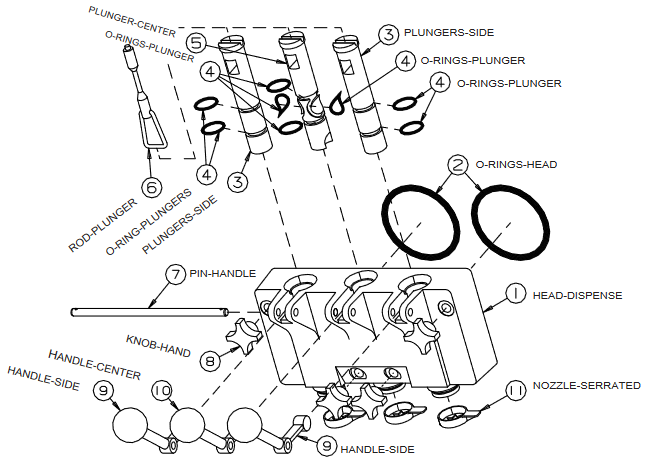
Figure 6-2
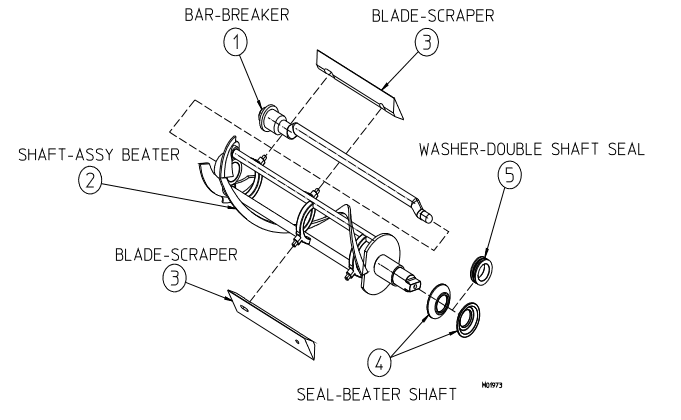
Figure 6-3
- If there is product in the freezer, refer to Section 9, Closing Procedures, 9.2 Draining Product.
- Remove plunger rods (6, figure 6-2) by lifting up and swinging the bottom out and down. From the dispense head (1, figure 6-2) remove the handle pin (7), handles (9,10), plungers (5,3) and nozzles (11). Remove head o-rings (2) and the o-rings from plungers (4).
- Remove the hand knobs (8) and gently pull the dispensing head (1) straight out.
- Remove the beater shaft (1, figure 6-3) from each cylinder. Then remove breaker bar (1), scraper blades (3) and shaft seal (3,4) from the beater shafts. Remove the cup seals (4) from the washer (5) on the shaft seal assembly.
- Remove hopper cover, drip tray and insert.
- Remove the mix feed tube (figure 6-4) from the hopper.
- Remove the O-ring (3) from the mix feed tube (1). Remove the regulator (2) from the mix feed tube.
Cleaning Instructions
The cleaning instructions explained in this section are procedures to remove bacteria and maintain a clean, sanitary freezer. The soft serve freezer must be disassembled, washed and sanitized according to the instructions in this manual. Always sanitize before start-up to ensure the best possible cleanliness.
CAUTION
Electric shock hazard. Do not splash water on switches or allow water to flow onto electrical components inside the machine.
CAUTION
To prevent bacteria growth, remove all o-rings when cleaning. Failure to do so could create a health hazard.
Note:The image gallery below contains figures 5-10 from the SL500 manual, and are included to help you follow along. If you are on a mobile device, you can click each image for a larger view of each graphic.
1. Prepare a three-compartment sink for washing, rinsing, and sanitizing parts removed from the freezer, per applicable health codes. Also, prepare a clean surface to air-dry all parts.
Important:
Do not use unapproved sanitizer or laundry bleach. These materials may contain high concentrations of chlorine bleach and will chemically attack freezer components.
NOTE: The sanitizer should be mixed according to the manufacturer's instructions to yield 100 parts per million (PPM) available chlorine solution. (example: Stera Sheen Green Label). Use warm water (100 to 110°F or 38 to 43°C) to wash, rinse, and sanitize. Make sure the sanitizer is mixed thoroughly and has completely dissolved.
2. Wash all parts removed from the freezer thoroughly with a warm, mild dish detergent solution. Clean the following parts with the appropriate supplied brush:
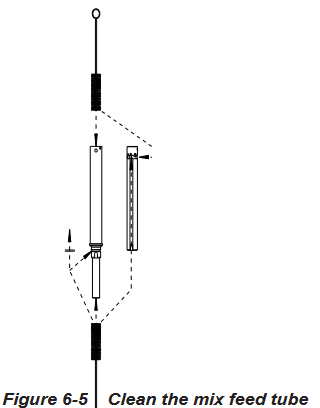
- a. The mix feed tube, regulator main bore and cross holes (figure 6-5).
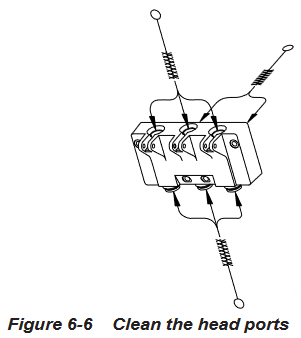
- b. The head plunger openings, center plunger ports, breaker bar cavities, o-ring grooves, dispense nozzle mounting and mix ports (figure 6-6).
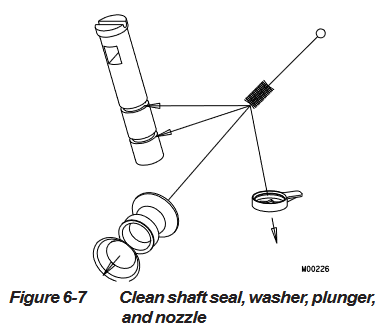
- c. The shaft seals, nozzles, and o-ring grooves and washers (figure 6-7).
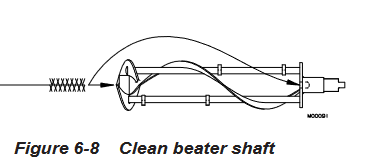
- d. The beater shaft inside the front collar and the hole on the rear flange (figure 6-8).
Important:
Do not leave parts in sanitizer for more than 15 minutes.
3. Using a warm mild dish detergent solution thoroughly brush:
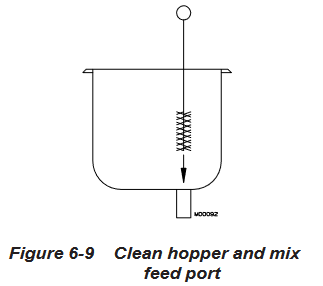
- a. the hoppers and the mix feed tubes from the hopper to the cylinders. (figure 6-9).
- b. the inside of the cylinders making certain to clean the back walls.
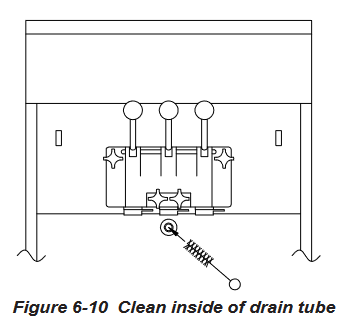
- c. the inside of the drain tube (figure 6-10). Dip the brush in the dish detergent solution and force brush into the drain tube until it stops - repeat until clean.
4. Wash the drip tray and insert in a warm dish detergent solution and rinse with clean water.
5. Wash the outside of the freezer with the dish detergent solution. Rinse with clean water.
Replace worn brushes. Use only Electro Freeze original or authorized replacement parts.
NOTE: It is your responsibility to be aware of the requirements for meeting federal, state, and local laws concerning the frequency of cleaning and sanitizing the freezer.